
Managing Units
Units in K2 are defined as an area that can be leased. Units allow you to assign various locations as one unit (for example: a tenant may wish to lease three offices in three different buildings under one lease agreement). Another example would include where several floors within the same building are leased to different tenants.
To add or edit a unit, do one of the following:
Navigate to Organisation > Units > New Unit to add a unit.
Double-click an existing unit in the Navigator panel.

Search for and open the relevant existing unit.
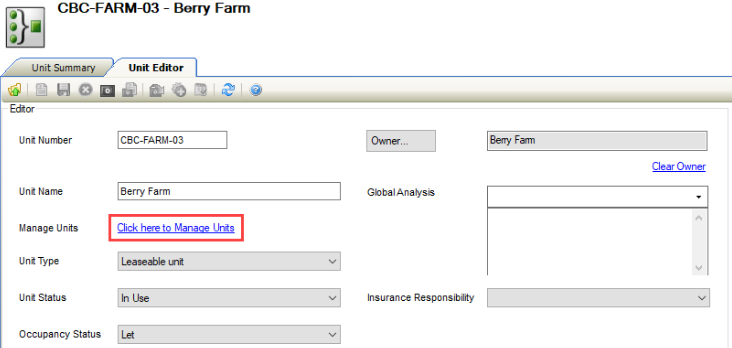
The Unit Editor is displayed.
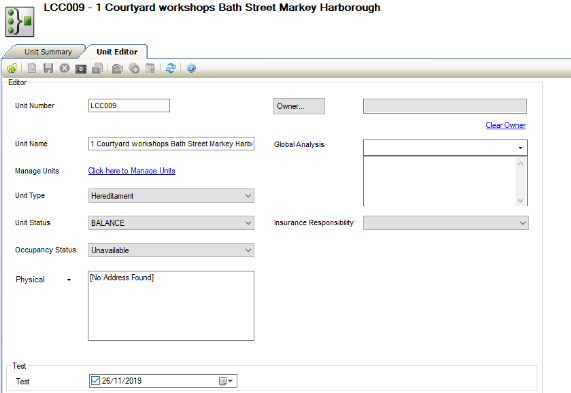
Enter or edit the relevant details.
The fields on the Unit Editor are described in the following table:
This field… | Holds this information... |
|---|---|
Unit Number | A unique reference number for the unit. |
Unit Name | The name of the unit. |
Manage Units |
This link is only enabled after saving the unit record. Refer to Managing Unit Location Items for further information. |
Unit Type | The type of unit (for example functional, hereditament and so on). These can be defined in Unit Type Reference Data (accessed by navigating to Functions > Core > Reference Data > Units). |
Unit Status | The unit's physical status. These can be defined in Physical Status Reference Data (accessed by navigating to Functions > Core > Reference Data > Core). |
Occupancy Status | The unit's occupancy status (for example: let, vacant and so on). These can be defined in Unit Occupancy Status Reference Data (accessed by navigating to Functions > Core > Reference Data > Units). |
Physical/Invoice/Postal/Trade |
Double-clicking in the field displays the Edit Address Details window, where you can edit the details for the address type. |
Owner | The business unit that owns the unit. |
Global Analysis | The level of global analysis. These can be defined in Global Analysis Reference Data (accessed by navigating to Functions > Core > Reference Data > Core). |
Insurance Responsibility | Who is responsible for the unit's insurance. These can be defined in Insurance Responsibility Reference Data (accessed by navigating to Estates > Valuation > Valuation). |
Click Save.
Click on the Unit Summary tab.
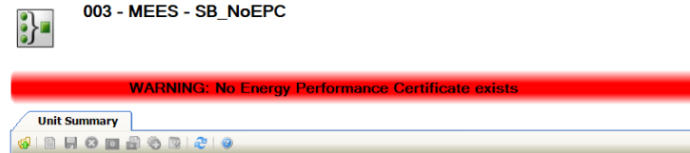
Where a Unit(s) has a linked building with no Energy Performance Certificate (EPC) either Domestic or Non-Domestic a banner will be displayed.
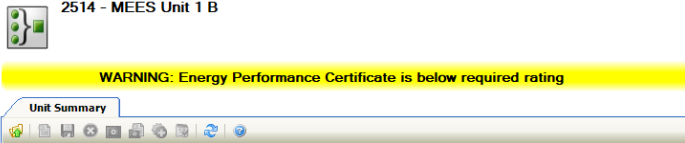
Where a Unit(s) has a linked building with an Energy Performance Certificate (EPC) either Domestic or Non-Domestic and a rating of F or below a banner will be displayed.
Where a Unit(s) has a linked building with an Energy Performance Certificate (EPC) either Domestic or Non-Domestic and a rating of E or above no banner will be displayed.
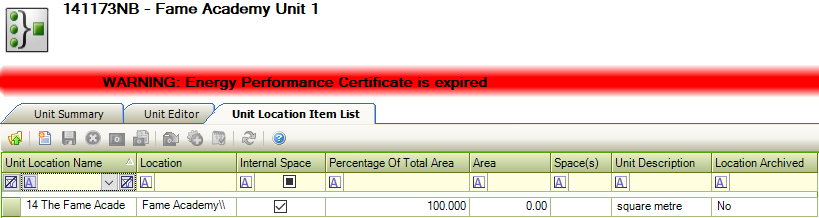
Where a Unit(s) has a linked building with an Energy Performance Certificate (EPC) either Domestic or Non-Domestic and the Valid Until Date is set as today's date or in the past, the expired banner will be displayed.
Where the system setting Enforce EPC Warning has been set to UnitAndLease or UnitOnly, the Energy Performance Certificate banner will display if the criteria are met.
Where Energy Performance Exempt has been selected in the Building Editor no banner will be displayed.
Use the Manage Unit Location Items screen to manage a unit's locations.
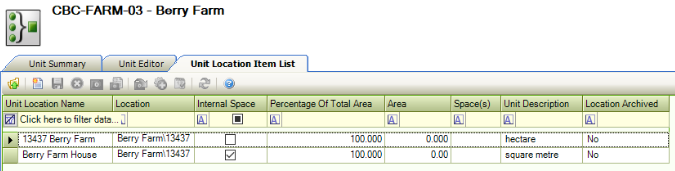
The screen can be accessed by clicking the Click here to Manage Units link in the Unit Editor.
The unit record must be saved before this link is enabled.
To add or edit a location:
Click the New button.

Alternatively, double-click an existing unit location record to edit it.
The Edit Unit Location window is displayed.
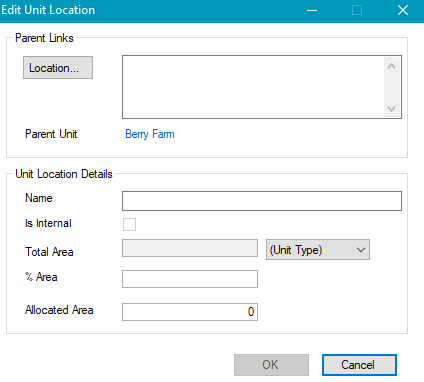
Enter or edit the details as required.
The fields on the Edit Unit Location window are described in the following table:
This field… | Holds this information... |
|---|---|
Location | The location.
 Use the level selector to select the relevant site, zone, building, sub-block floor or room. |
Parent Unit | The parent unit of the location. This is populated automatically based on the selected unit record. |
Name | The name of the location. This is populated automatically based on the selected location. |
Is Internal | Whether the location is an internal space. This is populated automatically based on the selected location and can only be edited in the location's record. |
Total Area | This is populated automatically based on the selected location and cannot be edited. Select from the adjacent drop-down list to change the metric of the area measurement. |
% Area | The percentage of the total area allocated to the unit. Editing this field automatically amends the Allocated Area field. |
Allocated Area | The area allocated to the unit. This is populated automatically based on the % Area of the Total Area but can be edited. Editing this field automatically amends the % Area field. |
Click OK.
Other Tasks/Associated Items
Unit schedules allow you to record one-off or recurring events for a unit.
Unit records must be saved to be able to add a unit schedule.
To add a unit schedule:
Open the relevant unit record.
Select New Unit Schedule from the Tasks panel.

The Event Schedule window is displayed.

Enter the details, as required.
The fields on the Event Schedule window are described in the following table:
This field… | Holds this information... |
|---|---|
Schedule for Type | This defaults to 'Unit Event'. |
Schedule for Item | This defaults to the unit details the event schedule is for. |
Event Type | The type of event. These can be defined in Unit Event Type Reference Data (accessed by navigating to Organisation > Unit > Units). |
Event Description | A description of the event. |
Set Start Date | This field is not available for unit events. |
Start Date | The start date. |
Single Occurrence | Whether the event is a one-off occurrence. |
End Date | The end date. Select whether there is no end date, whether the event is to end after a specific number of occurrences, or whether to end on a specific date. |
Notify | Whether a notification is required for the event(s). Enter the details of how far in advance of or after the event(s) that the notifications are displayed. |
Recurrence Span | The frequency of the event recurs. |
Do one of the following:
Click Save and Add New to save the event and add another one.
Click Save and Close to save the event and close the Event Schedule window.
Click Cancel to cancel the schedule.
Click Delete to delete the schedule.
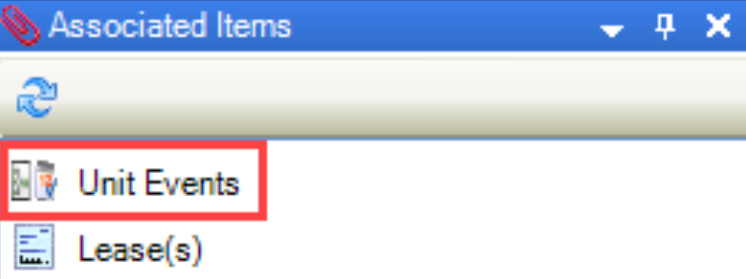
You can then select Unit Events from the Associated Items panel (once at least one event exists) to view and edit events.
To add or edit a restriction or warning:
Click the New Restriction\Warning option in the Tasks panel.

Alternatively, click the Restriction(s)\Warning(s) option in the Associated Items panel and then double-click an existing record to open it.

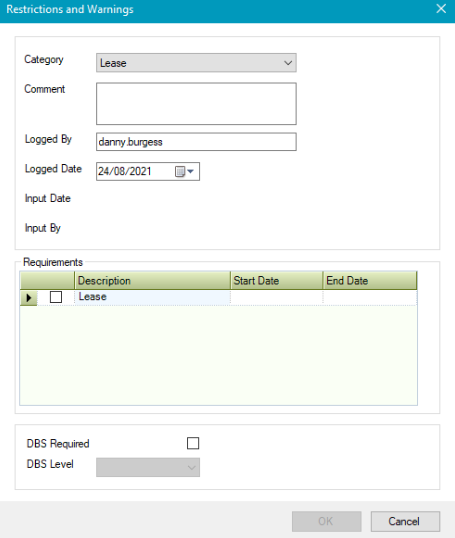
The Restrictions and Warnings window is displayed.
The fields on the Restriction and Warnings window are described in the following table:
This field… | Holds this information... |
|---|---|
Category | The category of restriction or warning. These can be defined in Restriction And Warning Category Reference Data (accessed by navigating to Functions > Core > Reference Data > Restrictions and Warnings). |
Comment | Any comments on the restriction or warning. This field is mandatory. |
Logged By | The user who logged the restriction or warning. This defaults to the logged-in user but can be amended. |
Logged Date | The date the restriction or warning was logged. |
Input Date | The date the restriction or warning was input. This defaults to the logged-in user on saving and cannot be amended. |
Input By | The user who input the restriction or warning. This defaults to the logged-in user and cannot be amended. |
Requirements | Any requirements for the restriction or warning. This is populated based on the selected Category and can be defined in Restriction And Warning Requirements Reference Data (accessed by navigating to Functions > Core > Reference Data > Restrictions and Warnings). |
DBS Required | Whether a DBS check is required. |
DBS Level | The DBS level required for the restriction. This list is hard-coded and cannot be edited. |
Click OK.
To add or edit a Unit Division:
Click the New Unit Division option in the Tasks panel.
Alternatively, click the Unit Division(s) option in the Associated Items panel and then double-click an existing record to open it.

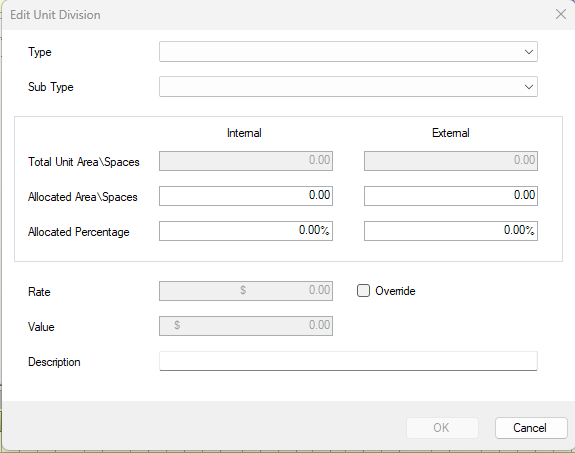
The Edit Unit Division window is displayed.
The fields on the Unit Division window are described in the following table:
This field… | Holds this information... |
|---|---|
Type | The Type of division within the Unit. This could be used as an organisation, or whomever owns the space. These can be defined in Unit Division Type Reference Data (accessed by navigating to Organisation > Unit > Unit Reference Data). |
Sub Type | The Sub Type of division within the Unit. This could be used as child organisations or departments. The Sub Type list is filtered based on the Type. These can be defined in Unit Division Sub Type Reference Data (accessed by navigating to Organisation > Unit > Unit Reference Data). |
Total Unit Area \ Spaces | The total Unit Area of all spaces linked to the Unit. This shows both Internal and External areas, where External refers to linked Sites or Zones. |
Allocated Area \ Spaces | The total area allocated to the Sub Type stored as the value. |
Allocated Percentage | The total area allocated to the Sub Type stored as a percentage. |
Rate | The Rate specified in reference data based on the total allocated area. The rates can be defined in Unit Division Sub Type Reference Data (accessed by navigating to Organisation > Unit > Unit Reference Data). |
Value | The total amount based on Allocated Area x Rate. |
Description | The description of the Unit Division. |
Click OK.
Related Topics
Click the links below to navigate to the following related topics: