Accounts Payable
Accounts Payable allows you to create a new Purchase Order, Invoice, and Credit Note.
The Invoice (Accounts Payable) Editor allows you to add a new Invoice (Accounts Payable) or edit an existing one.
To create a new Invoice (Accounts Payable):
Navigate to Finance > Accounts Payable > New Invoice.
Or
Search for and open the relevant Invoice (Accounts Payable).
The Invoice (Accounts Payable) Editor is displayed.
The fields displayed on the editor vary according to the Type selected. See below for the different variations of the editor screen.
Editor screen when Business Rates or Council Tax Type selected.
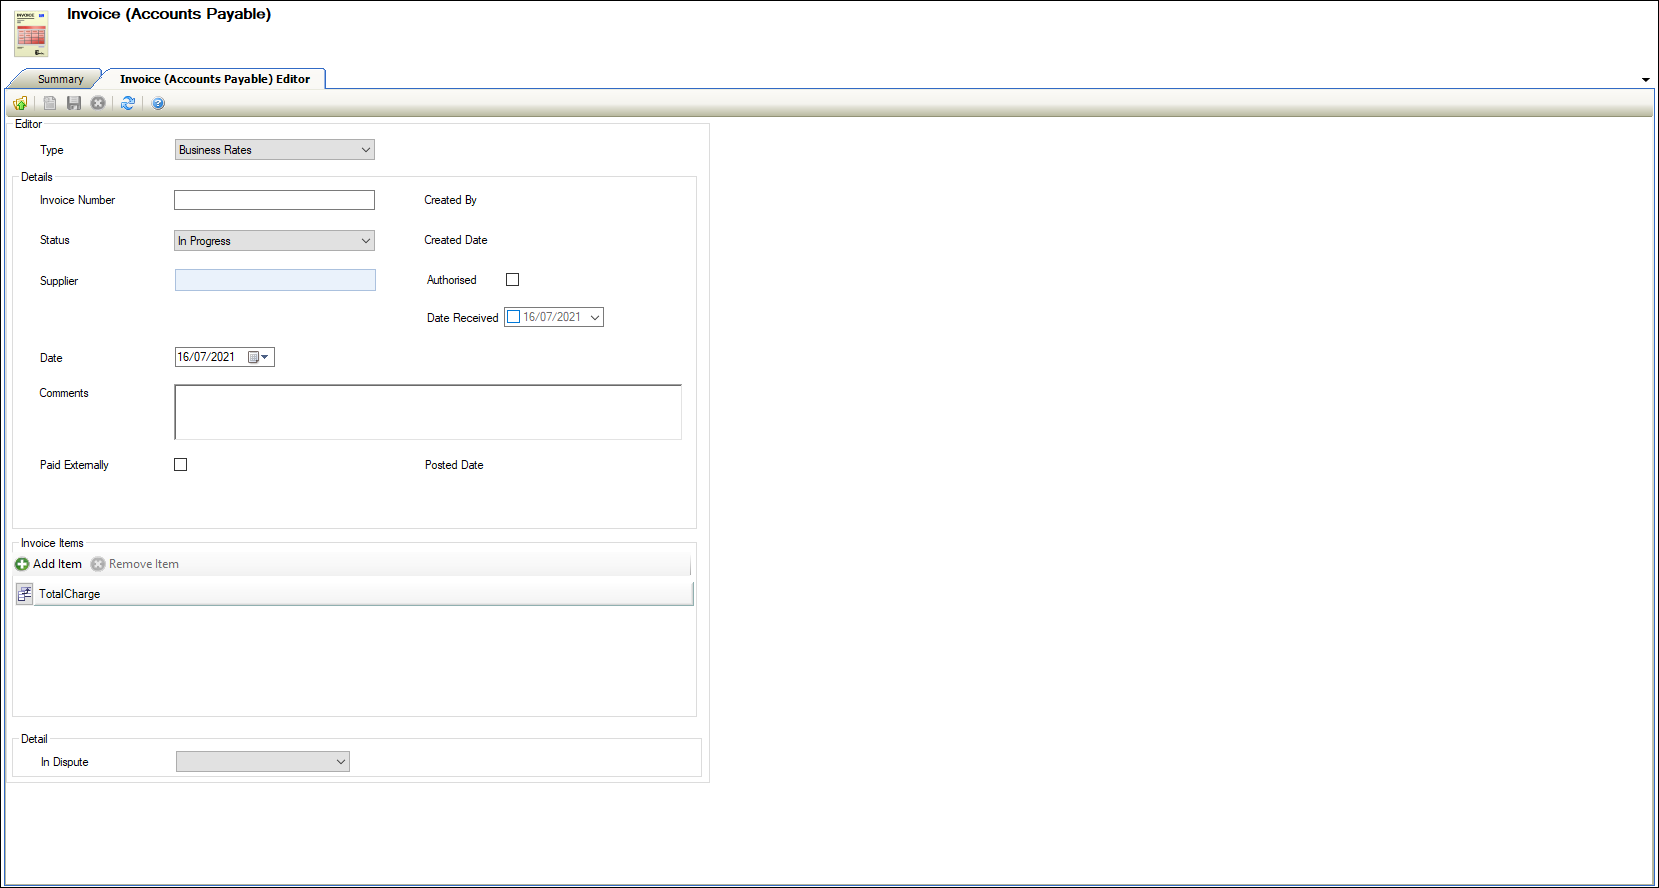
Enter details of the invoice.
The fields on the Invoice (Accounts Payable) Editor screen are described in the following table:
This field… | Holds this information... |
|---|---|
Type | The invoice type. Select from the drop-down list. |
Invoice Number | The invoice number. This field is mandatory. |
Status | The invoice status. Select from the drop-down list. These can be defined in Invoice (Accounts Payable) Status reference data (accessed by navigating to Finance > Finance). |
Supplier | The supplier. Select from the drop-down list. This field is mandatory. Suppliers are defined in the Agency Editor (accessed by navigating to Functions > Core > New Agency). Refer to Add or Edit an Agency for more information. |
Date | The invoice date. Select from the date picker. |
Comments | Comments about the invoice. |
Paid Externally | Whether the invoice is paid externally. |
Created By | The individual creating the invoice. |
Created Date | The date that the invoice was created. Select from the date picker. |
Authorised | Whether the invoice is authorised. |
Date Received | The date the invoice was received. |
Invoice Items | Items associated with the invoice. |
In Dispute | Whether the invoice is disputed. Select from the drop-down list. These can be defined in Invoice (Accounts Payable) Status reference data (accessed by navigating to Finance > Finance ). |
Click Save.
An invoice should be saved before adding invoice items.
Click Add Item to add an item to the invoice item.
The Edit Invoice Item window is displayed.
Enter details of the invoice item.
Invoice item editor screen for Business Rates and Council Tax.
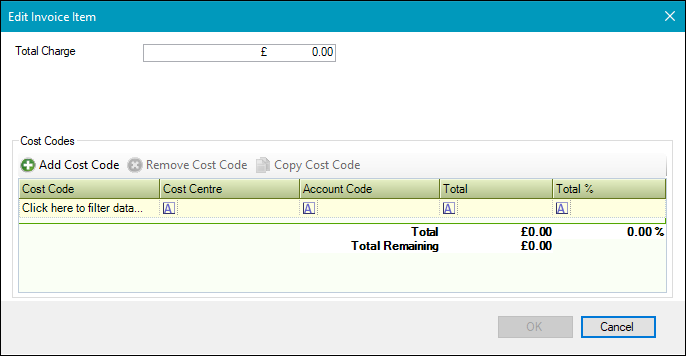
The fields on the Edit Invoice Item window (Business Rates or Council Tax) are described in the following table:
This field… | Holds this information... |
|---|---|
Total Charge | The total charge. |
Cost Codes | The cost code. |
Click Add Cost Code to apply a cost code to the invoice item.
The Cost Code Editor window is displayed.
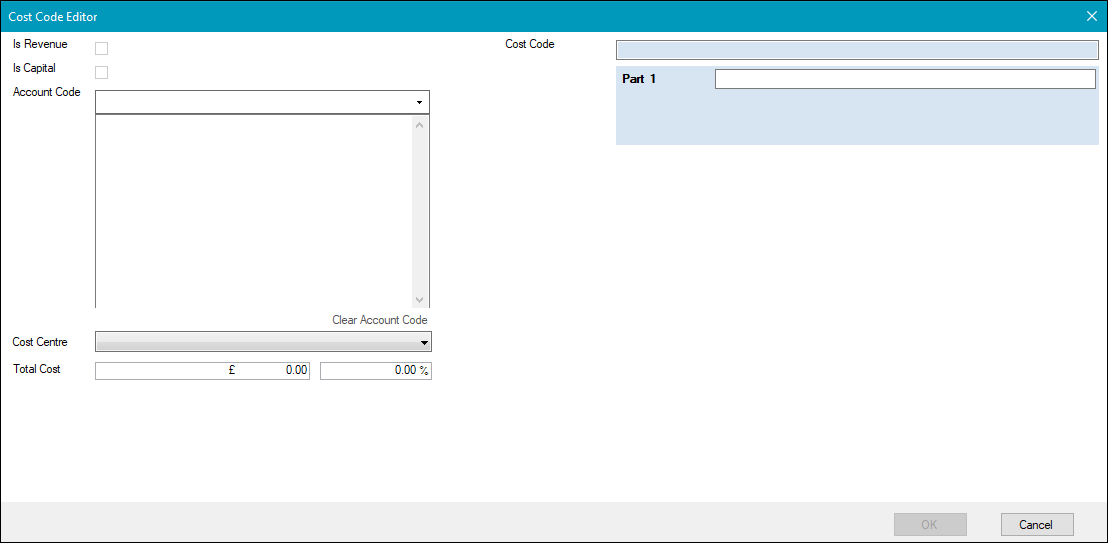
Enter details of the cost code.
The fields on the Cost Code Editor window are described in the following table:
This field… | Holds this information... |
|---|---|
Is Revenue | Whether the cost is related to revenue. |
Account Code | The account code. |
Cost Centre | The cost centre. These can be defined in Core reference data (accessed by navigating to Functions > Core > Reference Data > Core). |
Total Cost | The total cost. |
Cost Code | The cost code. |
Click OK.
Click OK.
Click Save.
When you create a new invoice, the following options are added to the Tasks panel:
Managing Attribute Definitions
New Audit Record
Select New Invoice (Accounts Payable) from the Task panel of an Order.
Navigate to Finance > Accounts Payable > New Invoice.
Or
Search for and open the relevant Invoice (Accounts Payable).
Alternatively, if you create from the Finance menu or search for an existing invoice the Invoice Editor screen will open first. Please see further down in this section for details.
The Edit Invoice Item dialog screen is displayed.
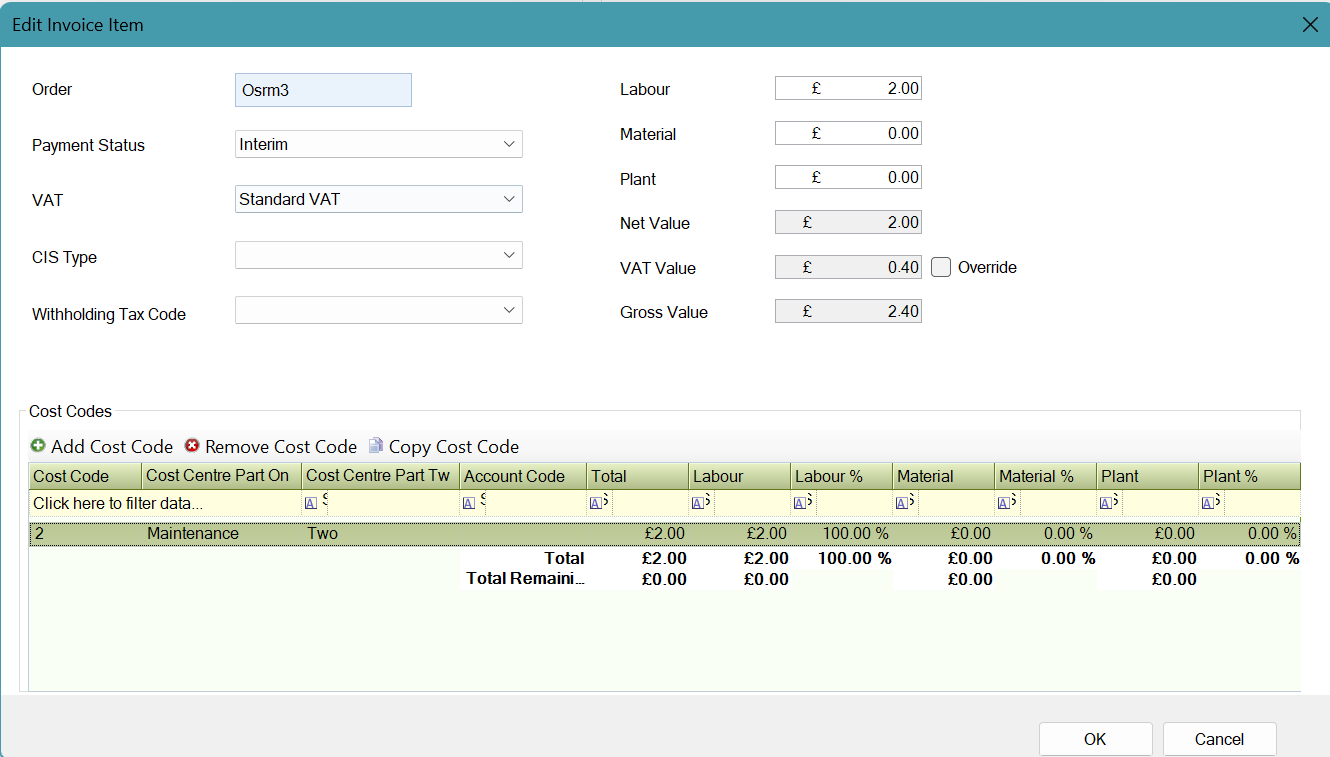
Enter details for the invoice.
The fields on the Invoice Item Editor screen are described in the following table:
This field… | Holds this information... |
|---|---|
Order | Prepopulated with the Order number the invoice is being created for. |
Payment Status | The payment status for the invoice. Select from the drop-down list. Selecting Final will cancel any remaining commitments on the order. |
VAT | VAT to be applied to the invoice. Select from the drop-down list. These can be defined in Invoice (Accounts Payable) Status reference data (accessed by navigating to Finance > Finance). |
CIS Type | Construction in Industry Scheme type to be applied to the invoice. Select from the drop-down list. Suppliers are defined in the Agency Editor (accessed by navigating to Functions > Core > New Agency). Refer to Add or Edit an Agency for more information. |
Withholding Tax Code | Withholding tax code to be applied to the invoice. Select from the drop-down list. |
Labour | Labour cost for the invoice. |
Material | Material cost for the invoice. |
Plant | Plant cost for the invoice. |
Net Value | Read only field. Net value will be calculated from the input to the Labour, Material and Plant fields. |
VAT Value | Read only field. Vat value will be calculated using the select in VAT. The VAT value calculated can be overridden by selecting the Override check box. This will enable the VAT value to be edited. |
Gross Value | Read only field. Gross value equals Net value plus VAT value. |
Cost Codes | Will be auto-populated from the linked Order. These can be changed if required. |
Click Add Cost Code to apply a cost code to the invoice item.
The Cost Code Editor window is displayed.
Enter details of the cost code.
The fields on the Cost Code Editor window are described in the following table:
This field… | Holds this information... |
|---|---|
Is Revenue | Whether the cost is related to revenue. |
Account Code | The account code. |
Cost Centre | The cost centre. These can be defined in Core reference data (accessed by navigating to Functions > Core > Reference Data > Core). |
Total Cost | The total cost. |
Cost Code | The cost code. |
Click OK.
Click OK.
Click Save.
The Invoice (Accounts Payable) Editor is displayed.
Invoices created from Orders will have Type default to Maintenance.
Invoice item editor screen for Maintenance.
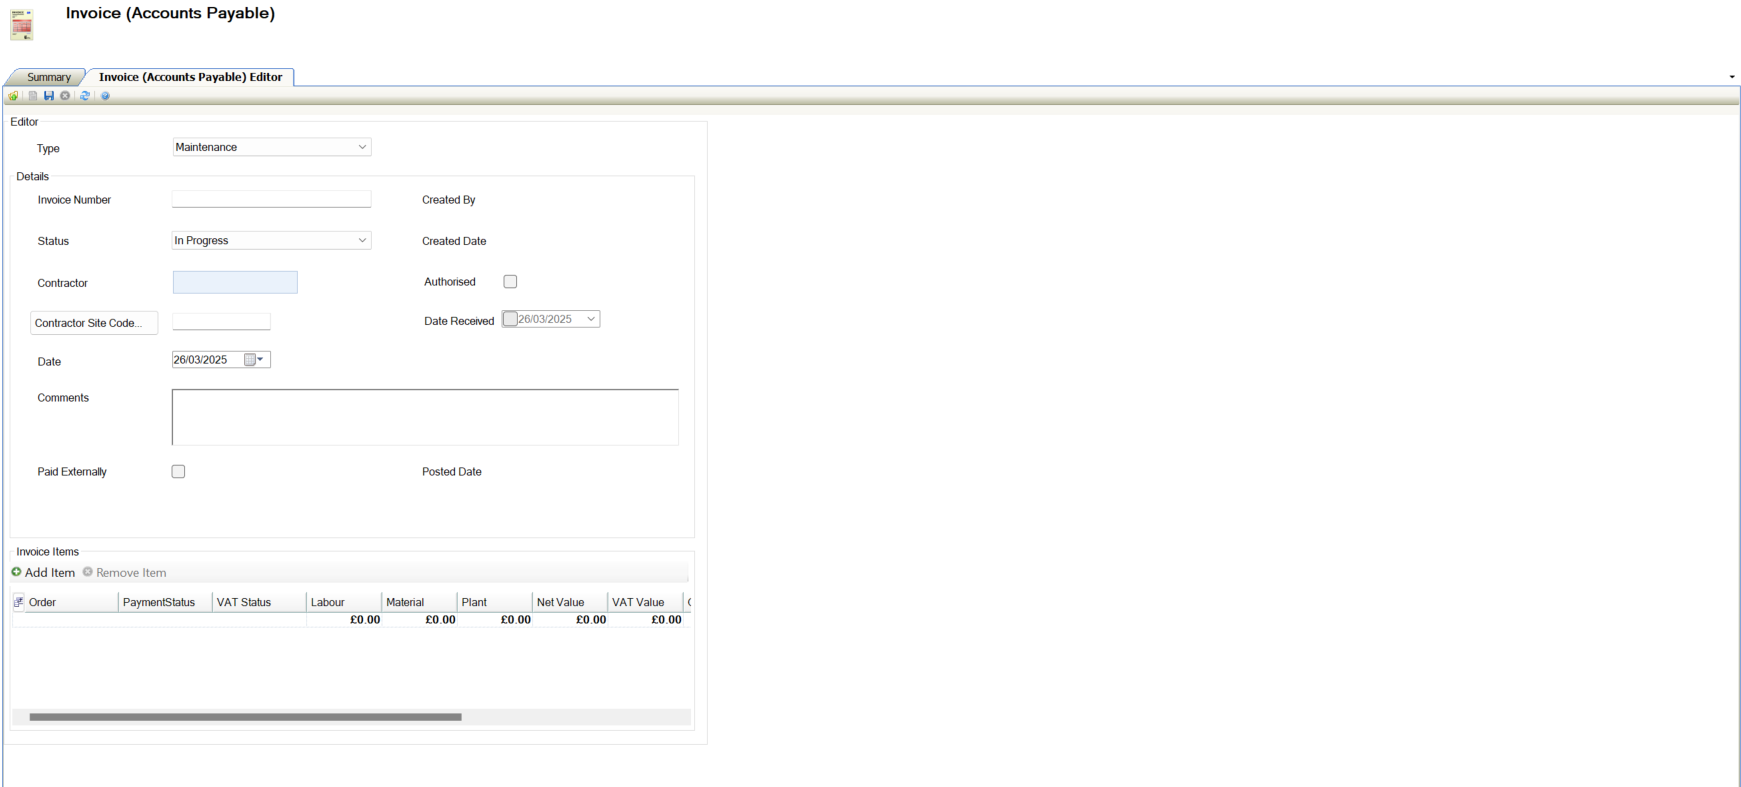
Enter details of the invoice.
The fields on the Invoice (Accounts Payable) Editor screen are described in the following table:
This field… | Holds this information... |
|---|---|
Type | The invoice type. Select from the drop-down list. Type will default to Maintenance when created from an order. |
Invoice Number | The invoice number. This field is mandatory. |
Status | The invoice status. Select from the drop-down list. These can be defined in Invoice (Accounts Payable) Status reference data (accessed by navigating to Finance > Finance). |
Contractor | The contractor. Select from the drop-down list. This field is mandatory. Contractors are defined in the Agency Editor (accessed by navigating to Functions > Core > New Agency). Refer to Add or Edit an Agency for more information. |
Contractor Site Code | The site code to be used for the Contractor. If the contractor has only one site code then the field will be populated. Alternatively select the Contractor Site Code button and select the site code from the list. |
Date | The invoice date. Select from the date picker. |
Comments | Comments about the invoice. |
Paid Externally | Whether the invoice is paid externally. |
Created By | The individual creating the invoice. |
Created Date | The date that the invoice was created. Select from the date picker. |
Authorised | Whether the invoice is authorised. |
Date Received | The date the invoice was received. |
Posted Date | The date the invoice has been posted. This is populated when an interface has been ran to extract invoices from K2. |
Invoice Items | Items associated with the invoice. |
Refer to the top of this section for adding Invoice Items.
If creating the invoice from the Finance menu or editing an existing one the invoice must be saved before adding or editing Invoice Items.
When you create a new invoice, the following options are added to the Tasks panel:
Managing Attribute Definitions.
New Audit Record.
The Invoice (Accounts Payable) Editor allows you to add a new Invoice (Accounts Payable) or edit an existing one.
To create a new Invoice (Accounts Payable):
Navigate to Finance > Accounts Payable > New Invoice.
Or
Search for and open the relevant Invoice (Accounts Payable).
The Invoice (Accounts Payable) Editor is displayed.
Editor screen when Utility Type selected.
Enter details of the invoice.
The fields on the Invoice (Accounts Payable) Editor screen are described in the following table:
This field… | Holds this information... |
|---|---|
Type | The invoice type. Select from the drop-down list. |
Invoice Number | The invoice number. This field is mandatory. |
Status | The invoice status. Select from the drop-down list. These can be defined in Invoice (Accounts Payable) Status reference data (accessed by navigating to Finance > Finance). |
Supplier | The supplier. Select from the drop-down list. This field is mandatory. The list of available suppliers is dependant on the suppliers linked to assets that are utilities. Suppliers are defined in the Agency Editor (accessed by navigating to Functions > Core > New Agency). Refer to Add or Edit an Agency for more information. |
Date | The invoice date. Select from the date picker. |
Comments | Comments about the invoice. |
Paid Externally | Whether the invoice is paid externally. |
Created By | The individual creating the invoice. |
Created Date | The date that the invoice was created. Select from the date picker. |
Authorised | Whether the invoice is authorised. |
Date Received | The date the invoice was received. |
Invoice Items | Items associated with the invoice. |
Posted Date | The date the invoice has been posted. This is populated when an interface has been ran to extract invoices from K2. |
Click Save.
An invoice should be saved before adding invoice items.
Click Add Item to add an item to the invoice item.
The Edit Invoice Item window is displayed.
Fields shown on Edit Invoice Item depend on the type of invoice being created.
Enter details of the invoice item.
Invoice item editor screen for Utility.
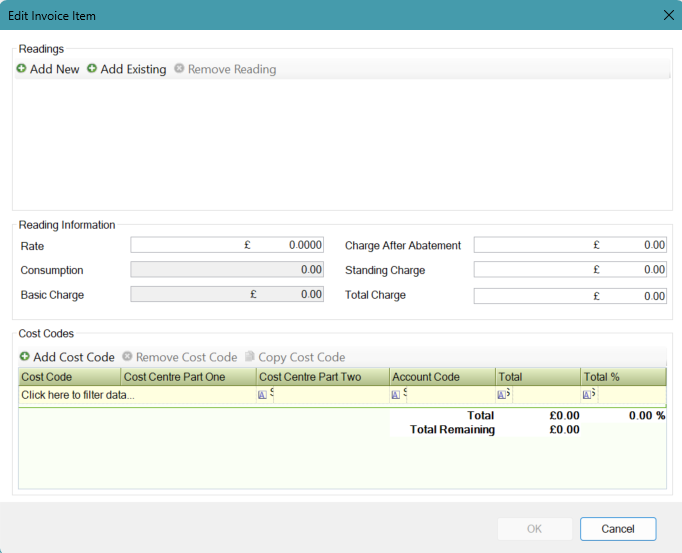
The fields on the Edit Invoice Item window are described in the following table:
Readings section fields
This field… | Holds this information... |
|---|---|
Add New | Add a new reading for the asset linked to the invoice. |
Add Existing | Add an existing reading from the asset linked to the invoice. |
Remove Reading | Remove a reading if it is not required for the invoice. |
Click Add New.
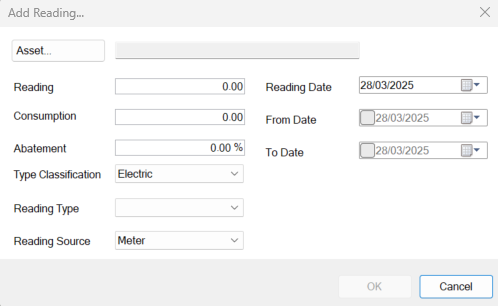
Add Reading window is displayed.
The fields on the Add Reading window are described in the following table:
This field… | Holds this information... |
|---|---|
Asset | The asset the reading is for. This is a mandatory field. |
Reading | The meter reading. |
Consumption | The consumption for the reading. This field will be populated from the reading(s). |
Abatement | The abatement to be applied to the reading. |
Type Classification | The classification type to be applied to the reading. This is a mandatory field. These can be defined in Reading Type Classification reference data (accessed by navigating to Functions > Core > Reference Data > Core). Configuration of this will determine the Reading Type drop-down list. |
Reading Type | The type of reading. This is a mandatory field. These can be defined in Reading Type reference data (accessed by navigating to Functions > Core > Reference Data > Core). |
Reading Source | The source of the reading. These can be defined in Reading Source reference data (accessed by navigating to Functions > Core > Reference Data > Core). |
Reading Date | The date the reading was taken. |
From Date | The date the reading is from. Period of time the reading is for. |
To Date | The date the reading is to. Period of time the reading is for. |
Click Asset.
The Asset Picker window is displayed and will contain all assets linked to the supplier selected on the invoice.
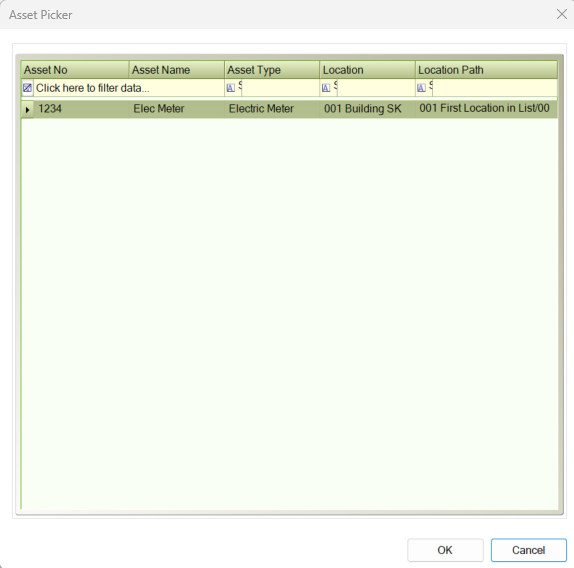
Select an asset for the reading to be linked to.
Click OK.
Alternatively:
Click Add Existing.
The Add Existing Reading window will be displayed. This will contain existing readings for assets linked to the supplier on the invoice.
Only readings not already linked to the invoice will be displayed.
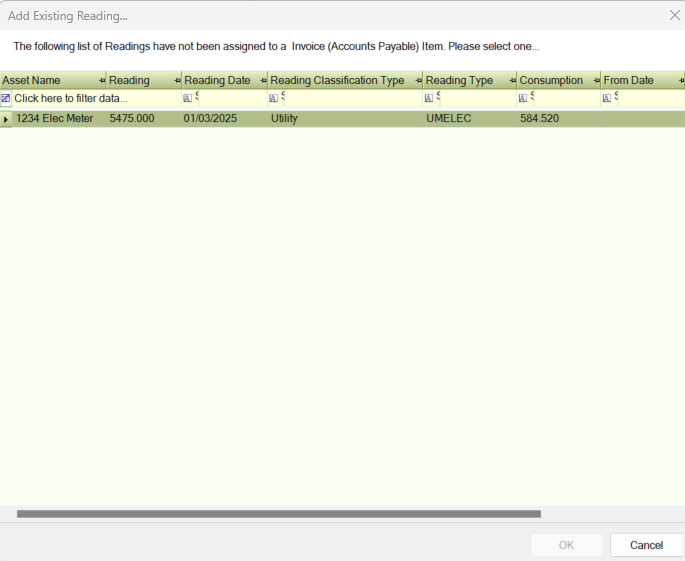
Select a reading row.
Click Ok.
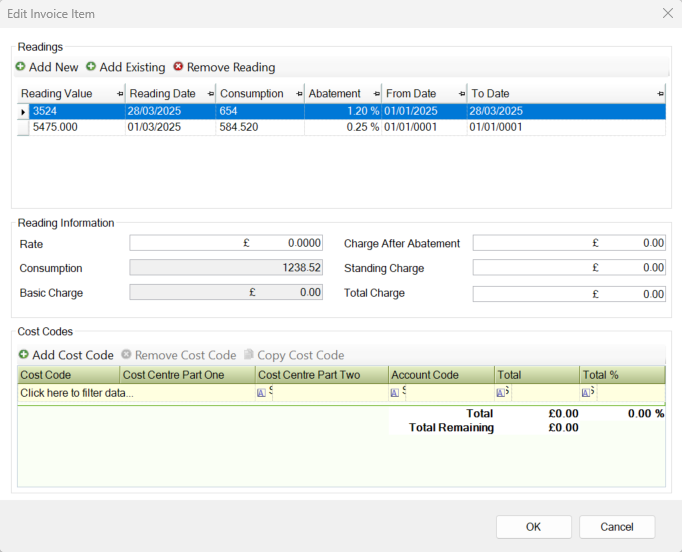
The fields on the Reading Information window are described in the following table:
This field… | Holds this information... |
|---|---|
Rate | The rate to be applied to the invoice. |
Consumption | Consumption is auto-populated from the readings linked to the invoice. Read only field. |
Basic Charge | Basic Charge is auto-populated from the readings linked to the invoice. Read only field. |
Charge After Abatement | The charge for the invoice after abatement has been applied. |
Standing Charge | The standing charge to be applied to the invoice. |
Total Charge | Total Charge is auto-calculated from the other fields in Reading Information. This field can be edited if required. |
Enter details for reading.
Click Ok.
Click Add Cost Code to apply a cost code to the invoice item.
The Cost Code Editor window is displayed.
Enter details of the cost code.
The fields on the Cost Code Editor window are described in the following table:
This field… | Holds this information... |
|---|---|
Is Revenue | Whether the cost is related to revenue. |
Account Code | The account code. |
Cost Centre | The cost centre. Note: These can be defined in Core reference data (accessed by navigating to Functions > Core > Reference Data > Core). |
Total Cost | The total cost. |
Cost Code | The cost code. |
Click OK.
Click OK.
Click Save.
When you create a new invoice, the following options are added to the Tasks panel:
Managing Attribute Definitions
New Audit Record
The Purchase Order Editor allows you to add a new Purchase Order or edit an existing one.
To create a new purchase order:
Navigate to Finance > Accounts Payable > New Purchase Order.
Alternatively, search for and open the relevant purchase order.
The Purchase Order Editor is displayed.
Enter details of the purchase order.
The fields on the Purchase Order Editor tab are described in the following table:
This field… | Holds this information... |
|---|---|
Purchase Order Number | The unique number that identifies the purchase order. This field is mandatory. |
External Reference | The supplier's reference number. |
Supplier | The name of the supplier providing the goods. Suppliers must be linked to a Purchase Ledger. This field is mandatory. Note: Suppliers are defined in the Agency Editor (accessed by navigating to Functions > Core > New Agency). Refer to Add or Edit an Agency for more information. |
Purchase Order Status | The status of the purchase order. Note: These can be defined in Order Status Reference Data (accessed by navigating to Finance > Accounts Payable > Order ). |
Description | The description of the order. |
Created Date | The date that the order was created. |
Authorised | Whether the purchase order is authorised. |
Due Date | The date that the order is due. |
Purchase Order Value | The value of the order. |
Authorised Purchase Order Variations Value | The value of authorised variations to the order. |
Total Value | The total value of the order. |
Click Add Item to add an item to the purchased item.
The Edit Purchase Order Item window is displayed.
Enter details of the purchase order item.
The fields on the Purchase Order Item window are described in the following table:
This field… | Holds this information... |
|---|---|
Stock Code | The stock code. Stock codes are defined in the Stock Code Editor (accessed by navigating to Stock Control > New Stock Code). Refer to Add a New Stock Code for more information. |
Description | The description of the item. |
Ordered Quantity | The quantity ordered. |
Unit Price | The price per unit. |
% Discount | The discount available as a percentage. |
Item Total | The total cost for the item. |
Click OK.
Click Add Cost Code to apply a cost code to the purchase item.
The Cost Code Editor window is displayed.
Enter details of the cost code.
The fields on the Cost Code Editor window are described in the following table:
This field… | Holds this information... |
|---|---|
Is Revenue | Whether the cost is related to revenue. |
Account Code | The account code. |
Cost Centre | The cost centre. These can be defined inCore Reference Data (accessed by navigating to Functions > Core > Reference Data > Core). |
Total Cost | The total cost |
Cost Code | The cost code. |
Click OK.
Click Save.
When you create a new purchase order, the following options are added to the Tasks panel:
New Purchase Order Variation
The Credit Note Editor allows you to add a new Credit Note or edit an existing one.
To create a new credit note:
Navigate to Finance > Accounts Payable > New Credit Note.
Alternatively, search for and open the relevant credit note.
The Credit Note Editor is displayed.
Enter details of the credit note.
The fields on the Credit Note Editor tab are described in the following table:
This field… | Holds this information... |
|---|---|
Credit Note Number | The credit note number. This field is mandatory. |
Status | The invoice status.
Note: These can be defined in Order Status Reference Data (accessed by navigating to Finance > Accounts Payable > Order ). |
Contractor | The contractor. Select from the drop-down list. This field is mandatory. Contractors are defined in the Agency Editor (accessed by navigating to Functions > Core > New Agency). Refer to Adding or Editing an Agency for more information. |
Contractor Site Code | The contractor site code. |
Date | The credit note date.
|
Comments | Comments about the credit note. |
Credited Externally | Whether the credit note is credited externally. |
Created By | The individual creating the credit note. |
Created Date | The date that the credit note was created.
|
Authorised | Whether the credit note is authorised. |
Date Received | The date that the credit note is due. |
Net Value | The net value of the credit note. |
Return Total Value To Hard Commitment | Whether to return the total value to hard commitment. |
Credit Note Items | The credit note items.
|
Click Save.
When you create a new credit note, the following options are added to the Tasks panel:
Other Associated Items/Tasks
The Audit Record allows you to add a new Audit Record entry or edit an existing one.
To create a new Audit Record:
Navigate to Finance > Accounts Payable > New Invoice.
Create a new invoice and save details.
Click on the Tasks tab.
Check that the new Audit task is now displayed.
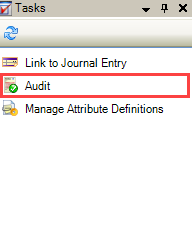
This will only appear when the invoice is not authorised and the user has ‘Recorded Invoice’ permission level Edit or Full.
A new tab labelled Audit Information has opened.
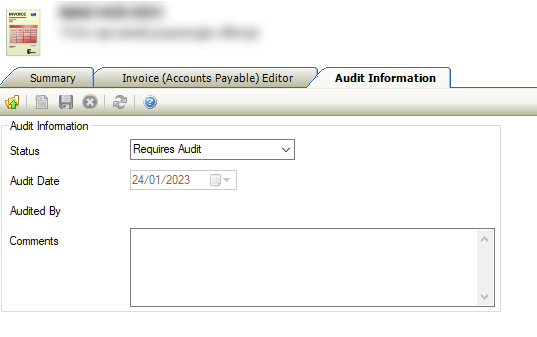
This field… | Does this... |
|---|---|
Status | Appears as a drop down with the following options: . Requires Audit . Failed Audit . Passed Audit |
Audit Date | Date audit took place and read only. |
Audited By | Name of Auditor and read only. |
Comment | Allows user to add comment to the audit. |
Where required add comments into the comments field.
Click on Save.
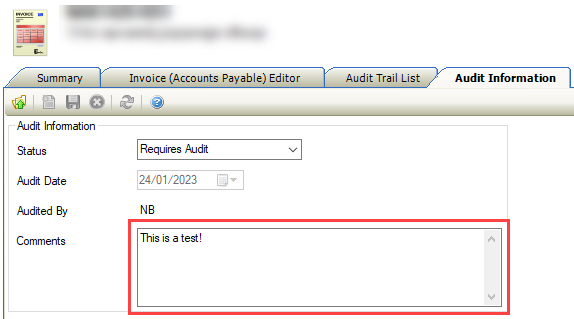
Check that the Audit task is removed from the Task panel.
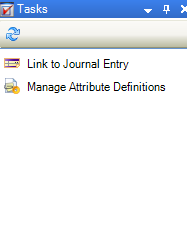
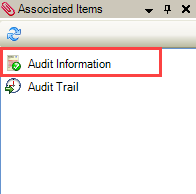
The audit task appears under Associated Items and is labelled Audit Information.
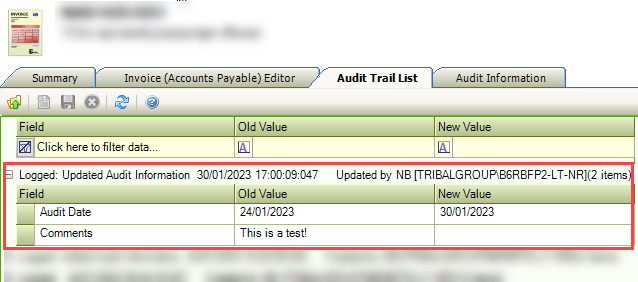
Click on Audit Trail.
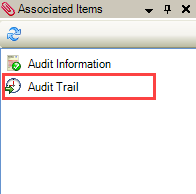
The Audit Trail List tab is opened and displays the following:
Updated Date and Updated By.
Old Value and Audit Date.
New Value and Audit Date.